Bacterial Transformation
1. Materials
2. Experiment Procedure
-
Take the competent cells out from -70°C and quickly place them on ice to thaw.
-
Add the DNA to be transformed into 100 μl of competent cells, gently tap the wall of the tube to mix (avoid using a pipette to aspirate), and let it stand on ice for 30 minutes.
-
After a 45-second heat shock at 42°C, quickly place the tube on ice for 2 minutes without shaking the centrifuge tube.
-
Add 900 μl of LB or SOC liquid medium (without antibiotics) to the centrifuge tube, mix well, and then incubate at 37°C with shaking at 200 rpm for 1 hour.
-
Centrifuge at 5,000 rpm (2,500 × g) for 3 minutes, discard the 900 μl of supernatant, resuspend the bacteria with the remaining medium, and then evenly spread on an LB agar plate containing the appropriate antibiotics.
-
Place the plate upright in a 37°C incubator for 10 minutes, after the bacterial solution has been completely absorbed, invert the plate for overnight culture.
Plasmid Extraction
1. Materials
| Component | DC221-01 (150 rxns) | DC221-02 (300 rxns) |
|---|---|---|
| RNase A Solution | 112.5 μl | 225 μl |
| Buffer P1 | 22.5 ml | 45 ml |
| Buffer P2 | 22.5 ml | 45 ml |
| Buffer NP3 | 52.5 ml | 105 ml |
| Buffer PW | 24 ml | 48 ml |
| Elution Buffer | 15 ml | 30 ml |
| FastPure DNA Mini Columns IV | 150 | 2 × 150 |
| 2 ml Collection Tubes | 150 | 2 × 150 |
2. Experimental Procedure
-
Take 1 - 4 ml (2 - 8 OD) of overnight cultured bacterial solution, centrifuge at 12,000 rpm (13,400 × g) for 1 minute to collect the bacterial pellet, and discard the supernatant as much as possible.
-
Recommended ratio of bacterial pellet volume to lysis buffer volume:
-

-
Residual culture medium will reduce the effectiveness of the lysis solution, so it should be discarded as much as possible.
-
Add 150 μl of Buffer P1 (please check whether RNase A Solution has been added), use a pipette or vortex mixer to mix until the bacterial pellet is fully resuspended. The resuspended solution should appear as a homogeneous dispersed state without obvious bacterial clumps or aggregates.
- After the bacterial pellet is fully resuspended, proceed immediately with the next step to avoid bacterial clumping, incomplete lysis, and to affect the extraction efficiency.
-
Immediately add 150 μl of Buffer P2, gently invert the tube 15 - 18 times, the bacterial solution should appear as a blue and clear viscous state.
- This step should be mixed gently, avoid vigorous shaking to prevent genomic DNA contamination. The bacterial solution should become clear and viscous, and the operation time should not exceed 3 minutes to avoid breaking the plasmid DNA.
- Ensure that all bacterial pellets are mixed with the lysis solution!
-
Add 350 μl of Buffer NP3, immediately invert the tube quickly 15 - 25 times until the blue color completely disappears, at this point, white and evenly distributed flocculent precipitate should appear, centrifuge at 12,000 rpm (13,400 × g) for 2 minutes.
- The solution turns from blue to colorless, indicating complete neutralization, avoid the appearance of large clumps of precipitate, which will affect the extraction yield and subsequent liquid handling operations.
- The supernatant after centrifugation should be clear, if there are small white precipitates floating on the surface of the supernatant, it will not affect the subsequent operations.
-
Carefully transfer the supernatant after centrifugation to the FastPure DNA Mini Columns IV adsorption column (place into a 2 ml Collection Tubes), centrifuge at 12,000 rpm (13,400 × g) for 30 seconds, discard the filtrate.
-
Add 700 μl of Buffer PW (please check whether anhydrous ethanol has been added) to the adsorption column, centrifuge at 12,000 rpm (13,400 × g) for 30 seconds, discard the filtrate.
-
Place the adsorption column back into the collection tube, centrifuge at 12,000 rpm (13,400 × g) for 1 minute, discard the collection tube.
- If there is residual ethanol in the adsorption column, it will affect downstream experiments, you can briefly open the cap and dry for 1 minute.
-
Place the adsorption column in a new 1.5 ml sterile centrifuge tube (self-prepared), add 30 - 100 μl of Elution Buffer to the center of the adsorption column membrane, centrifuge at 12,000 rpm (13,400 × g) for 30 seconds - 1 minute, discard the adsorption column.
- It is recommended that the elution volume should not be less than 30 μl, a smaller volume will reduce the elution efficiency.
- If using ddH2O for elution, ensure that the pH of ddH2O is between 7.0 - 8.5, a pH lower than 7.0 will reduce the elution efficiency.
- Preheat the elution solution at 65°C or perform a second elution to improve the elution efficiency of the plasmid. To increase the elution yield, you can perform a second elution with the centrifuged liquid.
-
Store the extracted plasmid DNA at -30 ~ -15°C.
SDS-PAGE
1. Materials
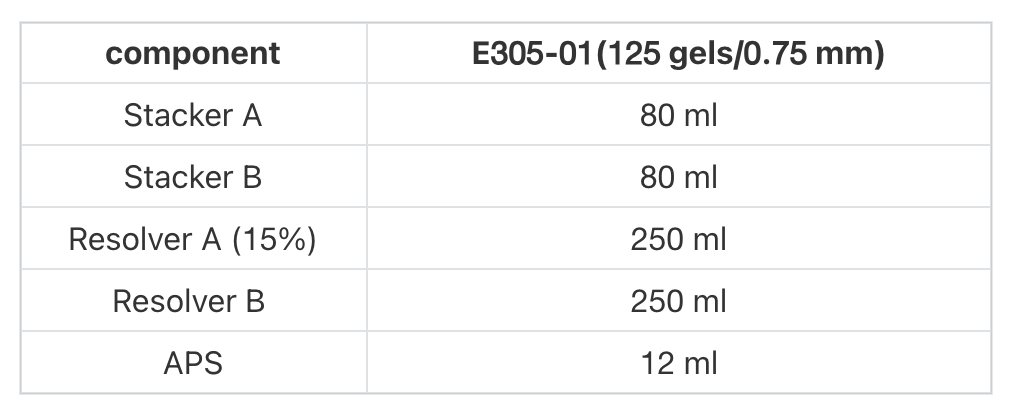
2. Experimental Procedure

- Each component should be mixed upside down 6-8 times before use.
- Preparation of the lower glue: Take equal volumes of Resolver A and Resolver B, 2.0 / 2.7 / 4.0 ml each, and mix well.
- Preparation of upper glue: Take equal volumes of Stacker A and Stacker B, 0.5 / 0.75 / 1.0 ml each, and mix well.
- Add 40/60/80 µl of APS to the mixed solution in Step 2, mix well immediately, and then inject into the glued glass plate so that the liquid level is about 1.5 cm short of the upper edge of the glass plate.
- This solution is excessive, please do not inject all of it.
- The mixing operation avoids violent oscillation, and avoid pouring air bubbles into the glued glass plate during the perfusion process.
- After the lower layer of glue is poured, the upper layer of glue should be injected into the glued glass plate within 3 minutes. If you find the preparation difficult, you can also choose to close the lower glue with ddH O or alcohol after filling the lower glue, and wait for the lower glue to solidify before pouring the upper glue.
- Add 10/15/20 µl of APS to the mixed solution in Step 3, mix well immediately, without waiting for the lower glue to solidify, the mixed solution can be gently injected into the glued glass plate, gently
- After the glue has solidified (about 15 min at room temperature), the comb teeth can be removed and used for electrophoresis. The recommended electrophoresis voltage is 150-200 V. The electrophoresis can be stopped when the bromophenol blue indicator reaches the bottom edge.
Coomassie Brilliant Blue Staining
Using a 1.0 mm thick gel as an example.
After electrophoresis is complete, remove the gel and wash off any residual electrophoresis buffer with ddH₂O to reduce background, discarding any excess ddH₂O.
-
Add an appropriate amount of staining solution to cover the PAGE gel. Staining at room temperature on a horizontal shaker for about 15 minutes will allow observation of bands at the ng level.
- Note: Different protein types and samples have varying isoelectric points and protein abundance, which may result in differences in staining times. If protein content is low, the staining time can be appropriately extended without causing background staining.
- After staining is complete, recover or discard the staining solution, add ddH₂O to wash away any residual stain, and then observe the results. Storing the gel in H₂O can make the background cleaner and more transparent.
Western Blot
1. Materials
- Solubilization Buffer: RIPA buffer with 25 mM Tris–HCl or HEPES (pH 7.6), 150 mM NaCl, 1% Nonidet P-40, 0.5–1% sodium deoxycholate, 0.1% SDS.
- Protease Inhibitors: Add PMSF, aprotinin, benzamidine, leupeptin, pepstatin, and EDTA.
- Phosphatase Inhibitors: Add p-nitrophenyl phosphate, NaF, orthovanadate, and calyculin A.
- Polyacrylamide Gel: Use SDS-PAGE gels, either homemade or precast.
- Power Supply: For both electrophoresis and blotting.
- Electrophoresis Buffer: TRIZMA-Base, glycine, and SDS in deionized water (pH 8.3).
- Western Transfer Buffer: TRIZMA-Base, glycine, and methanol in deionized water.
- Membrane/Filter Paper: Cut to gel size; use nitrocellulose or PVDF membranes.
- Blocking Solution: 5% skim milk or 2–3% BSA in PBS or TBS.
- Antibodies: Dilute primary antibody (1/200–1/1,000) and secondary antibody (1/1,500–1/5,000) in blocking solution. As for RNF114 expression detection, choose RNF114 Antibody [NBP3-15333] at 1:1000 dilution as primary antibody and choose HRP Goat Anti-Rabbit IgG (H+L) at 1:10000 dilution as second antibody.
- Membrane Wash Solution: PBS or Tris–HCl buffer with 0.05% Tween 20.
- Detection Substrate: Enhanced chemiluminescence (ECL) solution.
- Stripping Buffer: 62.5 mM Tris–HCl (pH 6.8), 2% SDS, 100 mM β-mercaptoethanol.
2. Methods
Sample Preparation
- Protein Extraction: Use freezing/thawing, sonication, or direct lysis with solubilization buffer.
- Add Inhibitors: Include protease and phosphatase inhibitors.
- Centrifuge: Remove cell debris, collect supernatant.
- Measure Protein Concentration: Adjust to 1–5 mg/mL.
Electrophoresis (SDS-PAGE)
- Prepare Gel: Use appropriate acrylamide concentration.
- Assemble Apparatus: Fill with electrophoresis buffer.
- Load Samples: Add SDS sample buffer, heat samples, load into wells.
- Run Gel: At constant voltage (e.g. 200 V).
Western Blotting
- Prepare Membrane: Cut to gel size, presoak PVDF in methanol.
- Assemble Blotting Layers: Avoid air bubbles.
- Transfer: Use wet or semi-dry transfer method.
- Mark Membrane: For identification.
Blocking
- Rinse Membrane: In PBS or Tris–HCl buffer.
- Block Membrane: Soak in blocking solution with gentle shaking.
Antibody Incubation
- Primary Antibody: Dilute and incubate membrane.
- Wash Membrane: Three times with wash solution.
- Secondary Antibody: Dilute and incubate membrane.
- Wash Membrane: Four times with PBS-Tween20.
Detection
- Rinse Membrane: In PBS or Tris–HCl buffer.
- Apply ECL Solution: Immerse membrane.
- Expose X-ray Film: Handle in a dark room or use gel image analyzer.
- Quantify Bands: Using densitometry software if needed.
Reprobing
- Strip Antibodies: Incubate membrane in stripping buffer.
- Wash Membrane: Three times with wash buffer.
- Reblock and Reprobe: Follow blocking and antibody incubation steps with new antibodies.
This concise protocol covers all essential steps for performing a successful Western blot.
Nanodrop Measurement of Proteins
1. Materials
- Nanodrop spectrophotometer
- Deionized water
- Clean, lint-free lab wipes
- Calibrated pipettor (0.5-2 μL)
- Sample buffer
- Protein/DNA samples
2. Procedure
-
Clean the optical surfaces by pipetting 2-3 μL deionized water onto the lower optical surface.
-
Close lever arm to contact upper pedestal with water. Lift arm and wipe both surfaces with clean lab wipe.
-
Open NanoDrop software and select Nucleic Acid application. Perform blank measurement with 1 μL buffer.
-
Clean optical surfaces after blank measurement.
-
Select appropriate constant for sample measurement.
-
Dispense 1 μL sample onto lower optical pedestal and close lever arm.
-
Select "Measure" in software. Review calculated concentration and purity ratios.
-
Review spectral output to assess sample quality.
-
Verify characteristic nucleic acid profile.
HPLC Purification of Proteins
1. Materials
- SDS-PAGE equipment
- Coomassie Brilliant Blue G (0.05%)
- Methanol solutions (50% and 10%)
- Microcentrifuge tubes
- SpeedVac centrifugal concentrator
- Achromobacter protease
- Tris-HCl buffer (0.1 mol/L, pH 9.0)
- Tween-20
- Ultrafree MC filter (22-μm)
- HPLC system with C18 column
2. Procedure
-
Separate target protein via SDS-PAGE. Stain with 0.05% Coomassie Blue G (15-30 min). Destain with 10% methanol/5% acetic acid solution.
-
Cut protein bands and transfer to microcentrifuge tubes. Include control gel section.
-
Add 1 mL 50% methanol, incubate 20 min at room temperature, discard supernatant.
-
Add 1 mL 10% methanol, incubate 20 min at room temperature, discard supernatant.
-
Dry gel pieces in SpeedVac (2 min).
-
Add 10 μL Achromobacter protease and minimum Tris-HCl buffer with 0.1% Tween-20.
-
Incubate at 30°C for 24 hours.
-
Centrifuge and filter through 22-μm Ultrafree MC filter at 12,000 rpm (2 min).
-
Add 50% acetonitrile/0.1% TFA solution to gel fragments, incubate at 4°C (30 min).
-
Concentrate the sample in a SpeedVac centrifugal concentrator to a volume of less than 100 μl. Add an appropriate amount of HPLC equilibration buffer to prepare the sample for HPLC analysis. Use reverse-phase HPLC with a C18 column to separate the peptides from the digest. Elute the peptides using a gradient of acetonitrile/2-propanol (3:1) containing 0.09% TFA. Detect the peptide UV absorption at 214 nm (for peptide bonds) and 295 nm (for tryptophan).
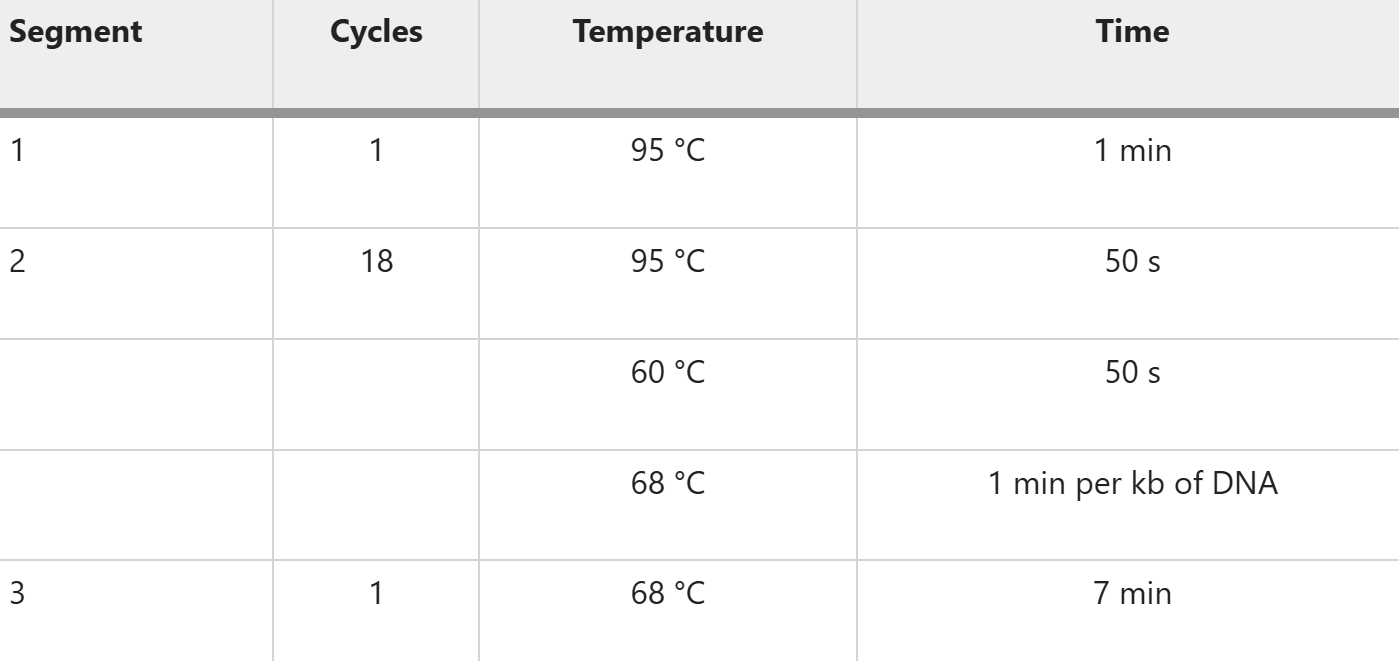
Colony PCR
1. reaction system

2. reaction procedure
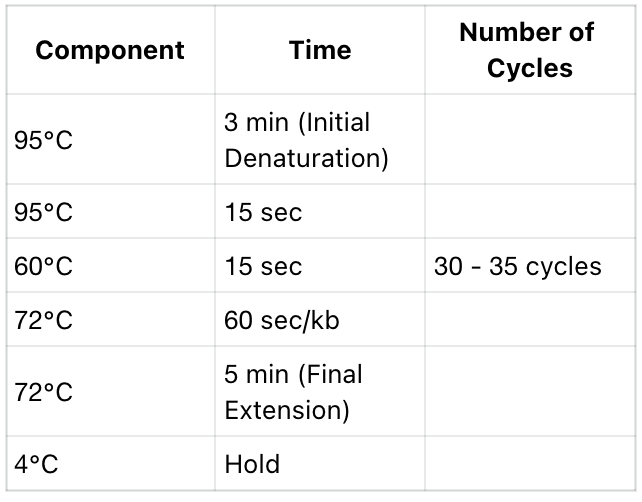
Notes:
- This initial denaturation condition is suitable for the majority of amplification reactions and can be adjusted based on the complexity of the template structure. If the template structure is complex, the initial denaturation time can be extended to 5 - 10 minutes to improve the denaturation effect.
- TThe annealing temperature needs to be adjusted according to the Tm value of the primers, generally set to 3 - 5°C lower than the primer Tm value; for complex templates, it is necessary to adjust the annealing temperature and extend the extension time to achieve efficient amplification.
DNA Agarose Gel Electrophoresis
-
Refer to the table below to prepare the reaction system, and add an appropriate amount of this product to a final concentration of 0.5 - 1×.
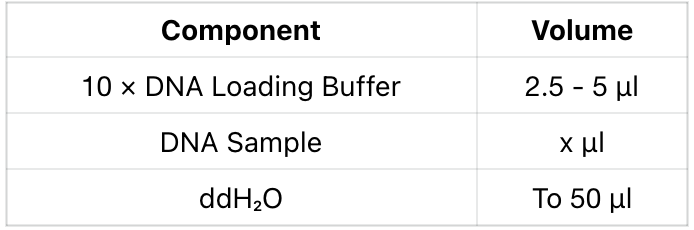
- 2. Gently mix, briefly centrifuge to collect at the bottom of the tube, and take an appropriate amount for agarose gel electrophoresis or non-denaturing polyacrylamide gel electrophoresis.
Gel Preparation
- Measurel g agarose powder and mix it with 100 mL lxTAE buffer in a Schott fask to useas an agarose gel stock. The amount and concentration can be adjusted, e.g. make 2gagarose in 100 mL 1xTAE a 2% gel.
- Microwave the mixture for 1 to 3 min until the agarose is dissolved completely. To not over-boil the solution, it can help to microwave in pulses and swirl the flask occasionally.
- Let the mixture cool down to about 50°C(about 5 min)
- Fill the amount of agarose solution needed for the gel size in a 50 mL falcon tube and addROTI®GelStain in a ratio of 1 pL gel stain to 10 mL agarose solution. Mix well.
- Set up the agarose gel tray with a gel comb of vour choice) in place and pour the mixturein.
- 6. Place the poured gel for 10 to 15 min at 4'℃ or let it sit at room temperature for 30 minuntil it has solidifed.
Sample Preperation
- Prepare the samples by adding 5 μL 6x loading dye to 25 pLof the sample in microcen-trifuge tubes.
- Mix well by pipetting up and down.
Running the Gel
- Place the solidifed agarose gel with the comb at the negative electrode (black)on thetray in the electrophoresis system.
- Fill the system with lxTAE buffer until the gel is completely covered.
- Carefully remove the gel comb.
- Connect the electrodes to the power pack and run the gel for 40 min at 100V5.
- Turn off the power and disconnect the electrodes when the dye line is approximately 75to 80% down the gel.
- Take the gel out of the system and carefully remove it from the agarose gel tray. The gel is ready for analysis with UV-light and gel extraction.
DNA Gel Extraction and Transfer
1. Gel Recovery Protocol
-
After DNA electrophoresis completion, quickly cut out the gel containing target DNA fragments under UV lamp. It is recommended to use paper towel to absorb surface liquid, cut into small pieces, and remove excess gel. Weigh the gel (excluding empty tube weight); 100 mg gel equals 100 μl volume as gel volume unit.
-
Add equal volume of Buffer GDP. Incubate in 50-55°C water bath for 7-10 minutes, adjusting time based on gel size to ensure complete dissolution. Invert and mix twice during water bath to accelerate dissolution.
- Adding 1-3x volume Buffer GDP doesn't affect DNA recovery. For DNA fragments ≤100 bp, add 3x Buffer GDP, dissolve in water bath, then add equal volume isopropanol, mix, proceed to step 3.
-
Briefly centrifuge to collect wall droplets. Place FastPure DNA Mini Columns-G into 2 ml Collection Tubes, transfer up to 700 μl dissolved gel solution, centrifuge at 12,000 rpm (13,800 × g) for 30-60 seconds. For volumes >700 μl, repeat process with remaining solution.
-
Discard filtrate, return column to collection tube. Add 300 μl Buffer GDP to column. Stand 1 minute. Centrifuge at 12,000 rpm (13,800 × g) for 30-60 seconds.
-
Discard filtrate, return column to collection tube. Add 700 μl Buffer GW (with anhydrous ethanol). Centrifuge at 12,000 rpm (13,800 × g) for 30-60 seconds.
- Add Buffer GW along column wall or invert/mix 2-3 times to wash off adhered salt.
-
Repeat step 5.
- Two Buffer GW washes ensure complete salt removal for subsequent experiments.
-
Discard filtrate, return column to collection tube. Centrifuge at 12,000 rpm (13,800 × g) for 2 minutes.
-
Place column in 1.5 ml sterile tube, add 20-30 μl Elution Buffer to column center, stand 2 minutes. Centrifuge at 12,000 rpm (13,800 × g) for 1 minute. Discard column, store DNA at -20°C.
- For maximum yield, re-adsorb solution onto column and repeat step 8. For >3 kb fragments, preheat Elution Buffer to 55°C for better recovery.
2. PCR Reaction Solution Recovery Protocol
Suitable for recovering/purifying DNA from PCR products, enzymatic reactions, or crude DNA. Removes contaminants like nucleotides, primers, primer dimers, salt ions, and enzymes.
-
Briefly centrifuge PCR/enzymatic reaction/crude DNA products. Measure volume, transfer to sterile 1.5/2 ml tube. For volumes <100 μl, add sterile water to 100 μl. Dilute high-concentration genomic DNA to 300 μl for better recovery.
-
Add 5x volume Buffer GDP, mix by inverting/vortexing. For DNA fragments <100 bp, add 1.5x volume (sample + Buffer GDP) anhydrous ethanol.
-
Place column in collection tube. Transfer up to 700 μl solution, centrifuge at 12,000 rpm (13,800 × g) for 30-60 seconds. For volumes >700 μl, repeat with remaining solution.
-
Continue with steps 5-8 from Gel Recovery Protocol.
CCK-8 (Cell Counting Kit-8)
1. Basic Protocol
-
Seeding Cells:
- Seed cells into a 96-well plate with a final volume of 100 μl.
- If there is no drug treatment, you can skip directly to step 5 after step 1.
-
Pre-incubation:
- Pre-incubate in a culture incubator (time is determined based on specific experimental requirements, with a recommended time of 18 - 24 hours).
-
Adding Drugs:
- Add the corresponding drugs to the wells.
-
Cultivation:
- Cultivate in a cell culture incubator at 37°C.
-
Adding CCK-8 Solution:
- Add 10 μl of CCK-8 Solution to the 96-well plate (if it's not a 96-well plate, ensure that the amount of CCK-8 Solution added is 10% of the volume of the culture medium in each well).
-
Incubation:
- Incubate in the incubator for 1 - 4 hours (the time can be adjusted).
-
Measurement:
- Measure the absorbance at 450 nm using a microplate reader.
-
Creating a Standard Curve
- Collect cells that can be passaged, determine cell density, and then seed the cells.
- Dilute the cells in a stepwise manner using culture medium at a ratio (e.g.1:2) to create a gradient of cell concentrations, typically with 5-7 gradients and 3-6 replicates per group. Seed into a 96-well plate with 100 μl of cell suspension per well.
- Add 10 μl of CCK-8 Solution to each well, gently mix, and incubate in a 37°C incubator for a certain period (depending on the type of cells, usually 1-4 hours). Measure the absorbance at 450 nm using a microplate reader, plot the standard curve with cell count as the x-axis and absorbance as the y-axis. This standard curve can be used to determine the cell count of unknown samples, provided that the experimental conditions are consistent with those used to create the curve.
-
Cell Viability Assay
- Seed cells into a 96-well plate (100 μl/well, avoiding bubble formation) and pre-incubate for 24 hours, while setting up a blank and control groups.
- Add 10 μl of CCK-8 Solution to each well (it is recommended to add along the wall of the well plate, gently shake to avoid bubble formation).
- Incubate in a cell culture incubator for a certain period.
- Measure the absorbance at 450 nm using a microplate reader.
-
Cell Proliferation and Toxicity Assay
- Seed cells into a 96-well plate (100 μl/well, avoiding bubble formation) and pre-incubate for 24 hours, while setting up a blank and control groups.
- Add different concentrations of the test compound to each well and incubate in the incubator for a period (determined by the test compound).
- Add 10 μl of CCK-8 Solution to each well (it is recommended to add along the wall of the well plate, gently shake to avoid bubble formation) and incubate in the incubator for a certain period.
- Measure the absorbance at 450 nm using a microplate reader.
-
Calculation Formula
Cell viability percentage = [(A-C)/(B-C)] × 100%
Inhibition percentage = [(B-A)/(B-C)] × 100%
A: Absorbance of the experimental group (including culture medium, cells, test compound, and CCK-8 Solution)
B: Absorbance of the control group (including culture medium, cells, and CCK-8 Solution)
C: Absorbance of the blank group (including culture medium and CCK-8 Solution)
Transformation of Fast-T1 Cells
-
Take the Fast-T1 competent cells out from -70°C, quickly place them on ice to thaw, add the target DNA (plasmid or ligation product), gently tap the wall of the tube to mix (avoid using a pipette to draw up), and let it stand on ice for 30 minutes.
-
After a 30-second heat shock at 42°C, quickly place the tube back on ice for 2 minutes, do not shake the centrifuge tube.
-
Add 900μl of LB or SOC liquid medium (without antibiotics) to the centrifuge tube, mix well, and then incubate at 37°C with shaking at 200 rpm for 1 hour.
-
Depending on the experimental requirements (plasmid or ligation product transformation): if it is a plasmid, you can mix by inverting the tube and directly take 100μl to spread on an LB agar plate containing the appropriate antibiotics; if it is a ligation product, it is recommended to centrifuge at 5,000 rpm (2,400 × g) for 3 minutes, discard the 900μl supernatant, resuspend the bacteria with the remaining medium, and then evenly spread on an LB agar plate containing the appropriate antibiotics.
-
Place the plate upright in a 37°C incubator for 10 minutes, after the bacterial solution has been completely absorbed, invert the plate for overnight culture.
Cultivation of E. coli
For Solid Medium
-
To cultivate cells on agar plates, incubate overnight at 37°C.
-
For genetically modified bacteria, use agar plates containing the antibiotic which the bacteria carry a resistance for; for non-resistant bacteria, use plates without ampicillin.
For Liquid Medium
-
To cultivate cells in liquid media, incubate at 37°C by shaking at 250 rpm.
-
When inducing protein expression via an inducable promotor, it is generally best to reduce cultivation temperature at the point of induction. Reduce to 18°C.
-
When inoculating the liquid culture from a cryostock, take a small amount of the frozen culture (using a pipette tip) and transfer it to 4 mL of liquid medium.
-
Add 4 µL of ampicillin stock (100mg/mL) to the culture if antibiotic selection is required (for pre-culture).
-
From the pre-culture, proceed to prepare the main culture as needed.
Module 2: Fusion Protein Module
Flow Cytometry
- Seed cells in 6-well plates (Corning, NY, USA) at a density of 1 × 10^6 cells per well and culture overnight.
- Replace the culture medium with fresh medium containing recombinant proteins at the indicated concentrations.
- After incubation, treat the cells with trypsin, wash them twice with PBS, and collect the cells.
- Resuspend the collected cells in PBS.
- Assess fluorescence intensity using flow cytometry (Becton Dickinson, Franklin Lakes, NJ, USA).
- Analyze the data using FlowJo 7.6 software (TreeStar, Ashland, Oregon, USA).
Confocal and Fluorescence Microscopy
- Seed cells (1.0 × 10^4 cells per well) in 24-well plates (Corning, NY, USA) and incubate at 37 °C overnight until 30% confluency.
- Treat the cells with recombinant proteins at the indicated concentrations.
- After incubation for 12 hours, wash the cells three times with precooled PBS (2.7 mM KCl, 137 mM NaCl, 10 mM Na2HPO4, and 2 mM KH2PO4).
- Fix the cells with paraformaldehyde (PFA, 4%) (Sangon, Shanghai, China).
- Stain the cells with 4,6-diamidino-2-phenylindole (DAPI) (Beyotime, Haimen, China) in the dark.
- Image the intracellular fluorescence distribution of recombinant proteins using confocal laser scanning microscopy (CLSM) (Nikon, Tokyo, Japan) and fluorescence microscopy (Nikon, Tokyo, Japan).Analyze the data using NLS software.
Molecular Cloning (Restriction Digestion and Ligation)
- Restriction Site Selection: Choose a restriction endonuclease whose recognition sequence is unique in the target vector and absent in the target fragment. For double digestion, consider the effect of buffer compatibility, and perform sequential digestion if necessary. For single digestion, cohesive ends, or blunt ends, dephosphorylate the vector using alkaline phosphatase.
- Primer Design and PCR Amplification: Introduce the corresponding restriction site and protective bases at the 5' end of the primer. Use a high-fidelity DNA polymerase for amplification and optimize the reaction conditions.
- Purification and Recovery of PCR Products: Perform gel electrophoresis to verify the PCR product, excise the gel fragment within 3 minutes, and use NanoDrop to measure DNA concentration. Then, proceed with restriction digestion of the purified product.
- Ligation Reaction: Catalyze ligation using T4 DNA ligase, maintaining a vector-to-insert molar ratio of 1:1 to 1:10 (optimal at 1:3). For blunt-ended vectors, dephosphorylation is required before ligation.
- Transformation and Plating: Use competent cells suitable for cloning. Mix the recombinant DNA with competent cells at a volume ratio of 1:10 and perform heat shock according to the protocol. Centrifuge the treated cell suspension at 2500×g for 3 minutes, remove excess LB medium using a pipette, resuspend the pellet in 100 µL of remaining medium, and spread on an agar plate.
- Screening and Identification of Single Colonies: Pick well-grown single colonies and suspend them in a 1.5 mL or 2 mL EP tube containing 10 µL of ddH₂O. Mix thoroughly and use 1–2 µL of the suspension as a template for colony PCR (10/20 µL reaction system) to confirm successful cloning.
Sanger sequencing
- Purify the plasmid with a plasmid miniprep kit (see protocol for plasmid isolation)
- Measure the concentration of the plasmid with the NanoDrop the amount of DNA usedfor sequencing should be approximately 30-100 ng/μl
- See NanoDrop Protocol.
- If the concentration is too high, dilute the sample with nuclease free water. The ideal concentration is around 80 ng uL-1
- Mix 6 ul of the DNA with 6 ul of a forward sequencing primer in one sequencing tube.
- If you want to sequence both strands of your DNA sample, mix 6 ul of DNA with 6ul of a reverse sequencing primer in another sequencing tube.
- Do not add forward and reverse primers in the same tube!
- Label the prepared sequencing samples with the barcodes and write down which sequencing ID corresponds to which sample in your lab book.
- Send your samples to the sequencing company where you have the barcodes from. (Oursamples were sequenced by eurofins)
- The sequencing ID from the barcode can be used to view the results of the sequencing onthe company's website.
- After receiving the sequencing results, review them and compare them to the expectedsequence. To do so, it is easiest to do a sequence alignment.
- Normally you will receive a data file containing the signal strengths. Reviewing thisdata you can get a glimpse of the sequencing quality and the purity of the isolatedplasimd.
Image-J
Materia (additional to SDS-Page):
BSA Protein (solid), ddH₂O
Methods:
- Solute BSA in water.
- Create multiple standards with known concentrations using serial dilutions)
- Load the standards on the same gel as your samples (important!) and run the gel
- Refer to the SDS Page protocol for a step by step instruction.
- After staining the gel and transferring it to transparent plastic foils, scan the gel. Retrievethe image fle and store it on a Computer that has the ImageJ software installed
- Open the ImageJ software and open the image file of your gel by clicking 'File' and 'Open...' or pressing Ctrl+O.
- After opening the image file, select the 'Rectangle' and mark your first lane on the gel. Make sure the marked lane includes white space on the left and right.
- Hint: The next lanes you mark will have the same rectangle in height, so make sure the first is long enough
- Go to Analyze , Gels , Select first lane or press ctrl+1.
- Grab the rectangle and drag it to the second lane.
- Go to Analyze→Gels→Select next lane or press Ctrl+2. Repeat this step (still using Ctrl+2) until all lanes are marked
- After all lanes are defined, click Analyze→Gels→Plot lanes or use Ctrl+3.
- A window showing a histogram for each lane opens up. Select the line tool and mark the bottoms of the peaks in the histograms. Compare the number of peaks to the number ofbands in each lane(this should match)
- After all peaks are correctly defned, use the 'wand (tracing)' tool and click on the area of the first peak.
- After clicking on all peaks, you can now save the data as a . CSV data file and transfer it to graphic analytic software like Excel.
- For the standards plot, the known concentrations and the peak areas. You should receive a linear plot.
- Do a linear regression fit. Make sure that the intercept with the Y axis is not too far from Zero.
- After having the linear equation calculated (y=m*x+b) you can solve the unknown concentrations X, of your proteins, using the peak area of ImageJ. y is the peak area respectively.
- Xi=(yi-b)/m
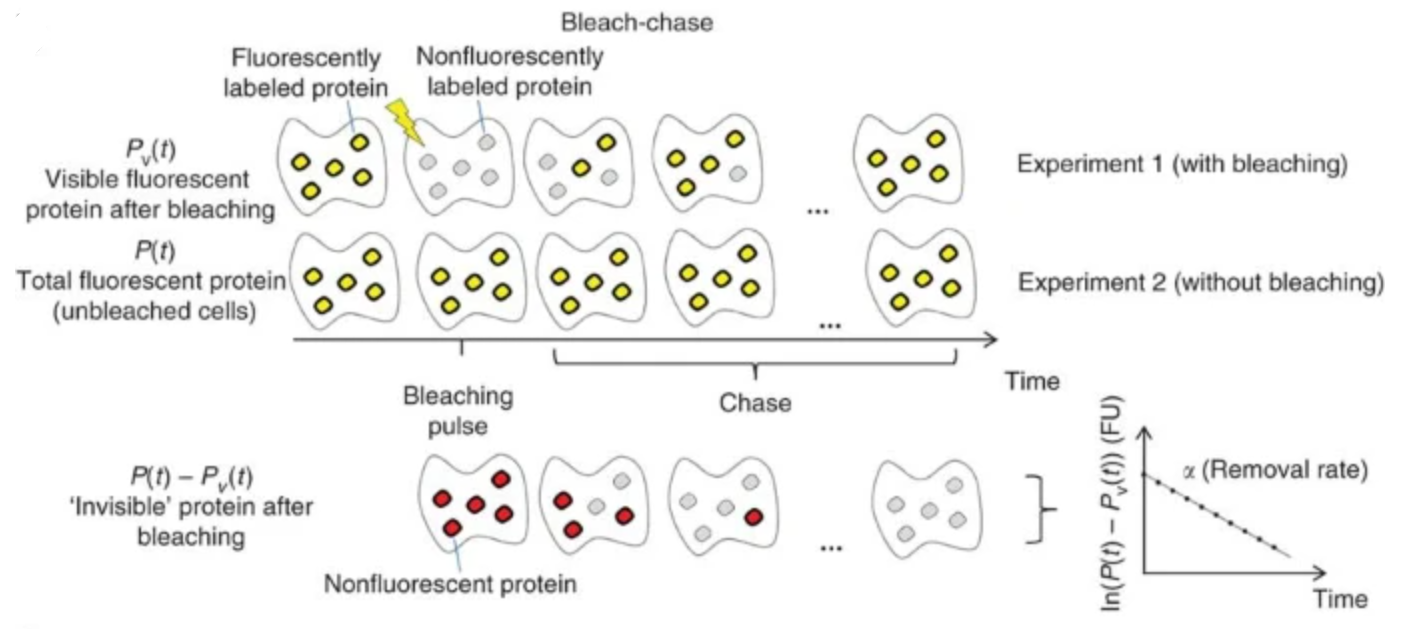
Bleach-chase
- The fluorophore of a tagged protein is bleached using a brief pulse of light, irreversibly causing it to become nonfluorescent (experiment 1). This generates two subpopulations of the tagged protein: fluorescent and nonfluorescent (yellow and gray, respectively).
- After bleaching, the nonfluorescent proteins are no longer produced and therefore decay at a rate that depends solely on protein removal (decay of gray proteins in experiment 1), in a manner analogous to the decay of radiolabeled tagged proteins in the pulse-chase experiment. However, the nonfluorescent proteins are invisible by fluorescence microscopy and cannot be measured directly.
- Repeat the same experiment without bleaching (experiment 2) and subtract the visible fluorescent signal of the two experiments
Methods:
- Thawing cells
- Thaw the vial of frozen cells by adding warm (37 °C) growth medium (up to 1 ml) to the vial.
- Transfer the thawed cells to a sterile 15-ml or 50-ml tissue culture tube with 10 ml of warm growth medium (repeat Steps 1 and 2 until all cells are thawed).
- Centrifuge the cells for 2 min at ∼300g at room temperature (20–25 °C).
- Discard the supernatant.
- Resuspend the cell pellet with 10 ml of fresh, warm growth medium.
- Transfer the resuspended cells to a sterile 10-cm tissue culture dish.
- Leave in the tissue culture incubator overnight.
- Repeat Steps 1–7 for all cell clones to be used in the experiment (each clone expresses a different fluorescently tagged protein).
- Plating cells for a time-lapse microscopy experiment
To plate cells on a 12-well optical plate, first apply 300 μl of fibronectin solution see REAGENT SETUP to each well in the plate.
- Incubate the plate for 45–60 min in the tissue culture incubator.
- Wash the plate twice with warm (37 °C) sterile PBS.
- Trypsinize, with 2 ml of trypsin, the cells from the 10-cm dish (those thawed the day before). Repeat Steps 3–5 and count with a hemocytometer.
- Plate the cells on the fibronectin-coated 12-well plate (seed about 8 × 10(6) cells in 2 ml of growth medium per well). Each clone should be seeded in two wells (one well for bleaching and the other for unbleached control).
- Incubate the cells in tissue culture incubator overnight.
- Calibrating the fluorescent lamp
- Open a folder on the computer named 'current.movie'.
- Open the YuvControl program.
- Place an optical 12-well plate with 2 ml of red RPMI 1640 media on empty wells with no cells. Either change the objective to a ×5 objective or lower the objective apparatus.
- Insert the plate into the microscope.
- Switch back to the ×20 objective.
- Find the bottom focus of the well and elevate the focus plane by 50 μm.
- Run the calibration macro program.
- Run calibration on the YFP filter and on the red mCherry filter.
- Bleaching
- Replace the growth medium in each well of the 12-well plate, previously seeded with the fluorescent cells, with 2 ml of complete transparent RPMI 1640 medium. Change to a ×5 objective or lower the objective apparatus.
- Insert the plate into the microscope.
- Switch back to the ×20 objective.
- Determine the appropriate bleaching exposure duration required for each protein. For convenience, this procedure may be performed on the same plate that is used for the time-lapse experiment. However, to prevent unwanted bleaching of the selected FOV, we highly recommend taking the snapshots on a distal area of the plate (at least 700 μm away from the nearest FOV).
- Acquiring a time-lapse movie
- Open the YuvControl program: press 'macro' and choose YuvControl. In the opened YuvControl window, you can control your time-lapse movie workflow by choosing the FOVs, the exposure times, the time-lapse interval, the duration of the movie and so on.
- Open the video microscope camera by pressing 'start preview' on the camera window.
- Open the transmitted light shutter and focus on the cells.
- Select FOVs (e.g., choose four FOVs in each well of a 12-well plate) and save the list of FOVs.
- For each clone, insert the appropriate bleaching exposure time and the nonbleaching exposure time (as determined in previous steps).
- Insert the appropriate fluorescent-shutter exposure times (for the bleached and unbleached FOVs in the YFP channel, as well as for the mCherry color). Each time you choose an FOV, the exposure times will be added to the information of the FOV. Each FOV is associated with x,y coordinates, a z-plane focus distance and the YFP and cherry exposure times.
- Insert the exposure time of the phase images and the AF plane images.
- Insert the desired interval time of the time-lapse movie in the window 'delay(sec)', on the YuvControl window.
- Determine the number of loops in the 'timeloops' field.
- Traverse over all FOVs and adjust the focus if necessary.
- Save the list of points.
- Press 'Run' to start the movie recording. Run the time-lapse movie for at least one round.
- Pause the movie.
- Adjust the bleaching exposure times for the wells that should be bleached.
- Run the movie for one round of bleaching. The movie loop with the bleaching exposure times can last for about 2–3 h.
- After one round, change exposure times back to normal (nonbleaching) exposure times.
- Run the movie for the desired amount of time.
- Image analysis and protein half-life measurement
- Apply image analysis software, such as PhenoTrack, to the time-lapse movies to extract individual cell traces
- Compute the protein fluorescence average dynamics over the individual cells in the bleached and unbleached populations
- Compute the protein removal, α, by obtaining the slope of the difference between the bleached and unbleached protein fluorescence on a semilogarithmic plot using a linear regression. Regression can be performed using Excel, MATLAB or any other parameter-estimation software. When the removal rate, α, is constant, the protein half-life is T(1/2) = ln(2)/α.
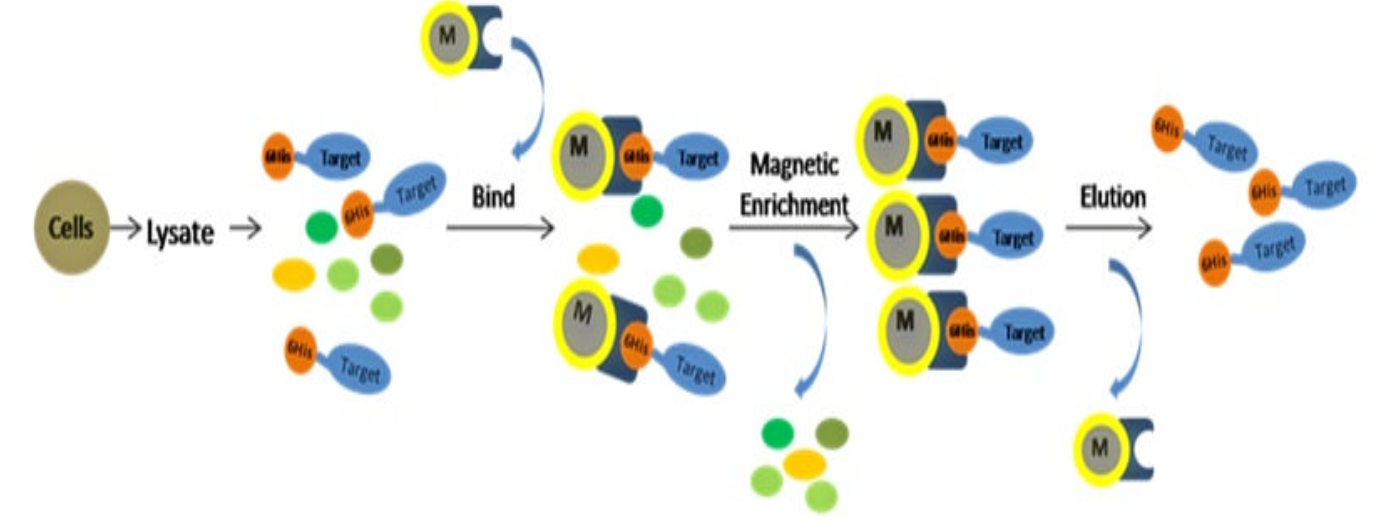
His tag affinity purification
Soluble protein fragmentation
- Collect the culture fermentation broth, centrifuge at 20℃, 5000rpm for 8 minutes, transfer the precipitate to a centrifuge tube, centrifuge at 10℃, 13000rpm for 1 minute, collect the precipitated bacteria (if not broken immediately, you can freeze it at -20 degrees.)
- Take 8-10 grams of bacteria and add 40-50ml of fragmentation buffer (for example: 20mM Tris, pH8.0, 0.15M NaCl, 1% Triton X-100, pH8.0). Add Leupeptin and Pepstantin to a final concentration of 1ug/ml, and add TCEP to a final concentration of 1mM/ml.
- Use an ultrasonic probe to fragment the mixed bacteria in ice water, ultrasonicate for 3S, and interval for 8S. Ultrasonicate for 15-20Min. (Ultrasound can be used to determine whether there are lumps in the solution and the viscosity of the solution)
- Centrifuge the broken liquid at 4℃13000rpm for 10 minutes, take the supernatant, centrifuge it again at 4'C13000rpm for 10 minutes, and then keep the supernatant and precipitate separately. Purify the supernatant first. If only the target protein is in the precipitate, extract it under denaturing conditions.
- Take the purified Ni column, clean the column, add 3-4ml nickel agarose gel, wash the column 5 times with a washing bottle, and then balance the column twice with the balance solution (PS: The balance solution is the broken solution, but does not contain Triton X-100.)
- Combine the column and the supernatant fully, place it on a four-dimensional rotating mixer and incubate it for 1-2 hours, then take it out for purification,
Purification of soluble proteins
- Equilibrium buffer: 50mM Tris buffer at pH 8.0 containing 0.15M NaCl and 20mM imidazole.
- Elution buffer:
- 50mM Tris buffer at pH 8.0 containing 0.15M NaCl and 50mM imidazole.
- 50mM Tris buffer at pH 8.0 containing 0.15M NaCl and 100mM imidazole.
- 50mM Tris buffer at pH 8.0 containing 0.15M NaCl and 300mM imidazole.
- Pass through the column, flow out FT, sample FT.
- Wash away the unadsorbed sample with 20 times column volume of equilibrium buffer at a flow rate of 1-2ml/min until the effluent spot G250 shows no blue, which is the beginning of elution of the protein adsorbed on the column.
- Use 50mM, 100mM, and 300mM imidazole concentrations to elute the column in stages, eluting about 5-10 column volumes (PS: if the protein adsorption is large, use more elution solution.), flow rate 1-2ml/min, 4m// tube collection. (Determination of the starting point of protein collection: the UV spectrophotometer reading rises rapidly, and the Coomassie Brilliant Blue G250 spot turns blue; determination of the end point of protein collection: Coomassie Brilliant Blue G250 spot has no obvious blue color, and the UV spectrophotometer reading decreases steadily.)
- Take samples of the collected proteins eluted from each concentration gradient and run SDS-Page.
- According to the SDS-Page electrophoresis diagram, if there is protein, collect the protein for dialysis. If there is no protein in the electrophoresis result, but there is protein in the precipitate, wash the precipitate under denaturing conditions and purify the precipitate.
UV-Vis (to measure protein absorbance at 280 nm)
- Instrument preparation
- Preheating: Turn on the UV spectrophotometer and preheat for 15-30 minutes.
- Set wavelength: Adjust to 280 nm.
- Blank calibration: Use the same buffer as the sample solvent (such as PBS) to inject into the quartz cuvette and adjust to zero.
- Sample preparation
- Dilute the sample: Make sure the absorbance is within the range of 0.1~1.0 (exceeding requires dilution).
- Avoid interference: Check the buffer composition (such as avoiding interferences such as SDS, nucleic acids).
- Measure absorbance
- Sample loading: Inject the sample into the quartz cuvette (no bubbles, fingerprints).
- Measurement: Put it into the sample pool, read the A280 value, repeat 3 times and take the average.
- Calculate concentration
- Extinction coefficient method:
- Concentration (mg/ml)=A280/(ε*l)
- (ε is the extinction coefficient, l is the optical path, usually 1 cm)
- Standard curve method:
- Use standard proteins such as BSA to make an A280-concentration curve and fit the linear equation.
- Extinction coefficient method:
- Correction for nucleic acid interference (if)
- Measure A260 and use the Warburg-Christian formula:Protein concentration (mg/ml)=1.55*A280−0.76*A260
Module 3: Hydrogel Module
PVA hydrogel crosslinking
Materials
PVA (Mowiol 18–88, 130 000 Da, 86.7–88.7% hydrolysis degree), NaOH, HCl, Lithium phenyl-2,4,6-trimethylbenzoylphosphinate (LAP), Divinyl sulfone (DVS). STF was prepared in MilliQ water (pH 7.4).
Chemical Functionalization of Poly(Vinyl Alcohol) (PVA) with Vinyl sulfone Groups (VS)
- 4 g of PVA Mowiol 18–88 (130 kDa, 86.7–88.7% hydrolysis degree) were dissolved in water at 4% w/v by constant magnetic agitation at 90 °C for 4 h.
- 0.1 m NaOH was slowly added to get a final polymer concentration of 2% w/v.
- A 1.5 molar excess of DVS with respect to the hydroxyl groups of PVA was added at room temperature under vigorous vortexing.
- The reaction was stopped after 1 min by adjusting the pH to 2 by dropping a 5 m HCl solution.
- The reaction mixture was purified by dialysis for 3 days against milli-Q water using a Spectra/Por Dialysis Membrane (MWCO: 3.5 kDa, Spectrum Laboratories, USA).
- After dialysis, the PVA-VS was freeze-dried and stored at room temperature.
Preparation of Stock Solutions of PVA-VS and PVA
- Solutions of PVA-VS and PVA at 10% w/v concentration in water were prepared by heating at 90 °C for 4 h.
- Higher polymer concentrations did not render homogeneous solutions in water.
Preparation of PVA-VS/PVA Hydrogels
- PVA-VS and PVA stock solutions were diluted to 5% w/v total polymer concentration.
- Variable PVA-VS/PVA ratio (95:5, 99:1, and 100:0) were prepared at room temperature by mixing the corresponding volumes of the stock solutions and diluting with a 1% w/v solution of LAP photoinitiator in BHI 2× medium.
- The concentration of LAP initiator in the final mixture was 0.5% w/v.
- For 10% w/v PVA-VS/PVA 100:0 hydrogels, LAP was directly added to the PVA-VS stock solution in a 0.5% w/v concentration.
- The precursor solutions were vortexed for 10 min, transferred to a mold (37 µL), and photocrosslinked with a UV light source (365–480 nm) at irradiance of 6 mW cm(−2) for 2 min.
Preparation of Bacterial-PVA-VS/PVA Hydrogels
- Engineered bacterium was inoculated and cultured in BHI supplemented with 50 µg mL(−1) of kanamycin overnight at 30 °C.
- A subculture with OD600 0.01 was isolated for 4 h before encapsulation.
- The bacterial suspension in BHI 2× medium was mixed with 10% w/v aqueous stock solutions of PVA-VS and PVA with PVA-VS/PVA 95:5 ratio and a LAP photoinitiator solution to obtain a 5% w/v total polymer concentration, 0.5% w/v LAP initiator and an OD600 of 0.05 (≈4 × 10(6) cells mL(−1)).
- The polymer/bacteria suspension was vortexed for 1 min, transferred to a mold, and photocrosslinked as specified in the previous section.
[1]: Puertas-Bartolomé M, Gutiérrez-Urrutia I, Teruel-Enrico L L, et al. Self-Lubricating, Living Contact Lenses. [J]: Advanced materials (Deerfield Beach, Fla.), 2024,36(27): e2313848. https://doi.org/10.1002/adma.202313848
Equilibrium Water Content (EWC) and Oxygen Permeability
- Hydrogel samples were dried at 60 °C for 4 h and the weight of the dried hydrogels (Wd) was recorded.
- Dried hydrogels were then submerged in 1.5 mL of STF for 24 h at 30 °C.
- After incubation, the hydrated samples were blotted using filter paper and weighted (Wt) again.
- The percentage of EWC was calculated using Equation (1):
$$EWC=((Wt-Wd)/Wt)×100$$
- The oxygen permeability, indicated as D(k), where "D" is the diffusivity of the lens and "k" is the oxygen solubility in the material, were calculated according to Equations (1) and (2):
$$Dk = 1.67e^{0.0397EWC} $$
[1]: Puertas-Bartolomé M, Gutiérrez-Urrutia I, Teruel-Enrico L L, et al. Self-Lubricating, Living Contact Lenses. [J]: Advanced materials (Deerfield Beach, Fla.), 2024,36(27): e2313848. https://doi.org/10.1002/adma.202313848
Equilibrium Water Content (EWC) and Oxygen Permeability
- Hydrogel samples were dried at 60 °C for 4 h and the weight of the dried hydrogels (Wd) was recorded.
- Dried hydrogels were then submerged in 1.5 mL of STF for 24 h at 30 °C.
- After incubation, the hydrated samples were blotted using filter paper and weighted (Wt) again.
- The percentage of EWC was calculated using Equation (1):
EWC=((Wt-Wd)/Wt)×100 (1)
- The oxygen permeability, indicated as D(k), where "D" is the diffusivity of the lens and "k" is the oxygen solubility in the material, were calculated according to Equations (1) and (2):
Dk = 1.67e^(0.0397EWC) (2)
[1]: Puertas-Bartolomé M, Gutiérrez-Urrutia I, Teruel-Enrico L L, et al. Self-Lubricating, Living Contact Lenses. [J]: Advanced materials (Deerfield Beach, Fla.), 2024,36(27): e2313848. https://doi.org/10.1002/adma.202313848
LIVE/DEAD™ BacLight™ Bacterial Viability Kits
Cultivation Conditions and Preparation of Bacterial Suspension
- Transfer 25 mL of bacterial culture into nutrient broth and cultivate until the logarithmic phase is reached.
- Centrifuge at 10,000×g for 10 minutes.
- Discard the supernatant.
- Resuspend the pellet in 2 mL of wash buffer.
- Add 1 mL of the cell suspension into 20 mL of wash buffer to dilute.
- Incubate at room temperature for 1 hour, mixing every 15 minutes.
- Centrifuge at 10,000×g for 10 minutes.
- Resuspend the pellet in 20 mL of wash buffer.
- Centrifuge at 10,000×g for 10 minutes.
- Resuspend the pellet in 10 mL of wash buffer.
Bacterial Staining
- Combine equal volumes of SYTO 9 and propidium iodide in a microcentrifuge tube.
- Add 3 µL of the dye mixture to each mL of bacterial suspension.
- Incubate in the dark at room temperature for 15 minutes.
- Use a micropipette to transfer 5 µL of the stained bacterial suspension onto a glass slide and cover with a coverslip.
- Cell imaging.
Spectral Information and Storage Conditions
- SYTO 9: Emission wavelength 480/500 nm, standard filter set FITC, store in the dark at ≤20°C.
- Propidium iodide: Emission wavelength 490/635 nm, standard filter set Texas Red, store in the dark at ≤20°C.
[1]: Puertas-Bartolomé M, Gutiérrez-Urrutia I, Teruel-Enrico L L, et al. Self-Lubricating, Living Contact Lenses. [J]: Advanced materials (Deerfield Beach, Fla.), 2024,36(27): e2313848. https://doi.org/10.1002/adma.202313848
Bacterial HA Production and Release
- One volume of a 0.1% sodium dodecyl sulfate solution was added to the samples and incubated at 20 °C for 30 min to avoid polymer precipitation.
- Samples were centrifuged for 15 min at 15 000g, and the supernatant was mixed with two volumes of ice-cold ethanol (99%) for separation and precipitation of HA.
- Precipitation was carried out overnight at 4 °C.
- Samples were centrifuged a second time for 10 min at 10 000g to precipitate all the polymer, and the precipitate was redissolved in the same initial volume of HPLC grade ultrapure water.
- The final concentration and M(w) range of HA in the samples was finally measured by GPC-SEC analysis with reflection index (RI), light scattering (LS), and viscometer (VS) detectors. The element used was HPLC grade ultrapure water.
[1]: Puertas-Bartolomé M, Gutiérrez-Urrutia I, Teruel-Enrico L L, et al. Self-Lubricating, Living Contact Lenses. [J]: Advanced materials (Deerfield Beach, Fla.), 2024,36(27): e2313848. https://doi.org/10.1002/adma.202313848
Cell Culture
- The NIH-3T3 cells (passages between 6 and 13) were cultured in Dulbecco's Modified Eagle's Medium (DMEM) High Glucose supplemented with 10% v/v fetal bovine serum (FBS), 1.0% v/v GlutaMax, and 1.0% v/v Penicillin/Streptomycin. They were cultivated in T75 (75 cm^2) flasks and passaged below 70% cell confluency
[1]: Puertas-Bartolomé M, Gutiérrez-Urrutia I, Teruel-Enrico L L, et al. Self-Lubricating, Living Contact Lenses. [J]: Advanced materials (Deerfield Beach, Fla.), 2024,36(27): e2313848. https://doi.org/10.1002/adma.202313848
Cytotoxicity of Bacterial Hydrogels
- NIH-3T3 cells were seeded in µ-Plate Angiogenesis 96 well-plate(16 000 cells cm^(−2)) and grown for 24 h.
- Cell culture media was removed, cells were washed twice with DPBS, and they were fed with supernatants from the bacteria hydrogels diluted in supplemented DMEM (1:9 dilution).
- After 24 h of incubation with the bacterial supernatant, the LDH assay was performed using the commercial kit CytoTox 96 Non-Radioactive (Promega) and following manufacturer's instructions.
- Equal volumes of the CytoTox 96 Reagent and supernatants (30 µL each) were mixed and incubated at room temperature for 30 min on a shaker (300 rpm) in the dark.
- 30 µL of the stop solution from the assay kit was added and the absorbance at 490 nm (A_490) was read using a plate reader (TECAN Spark).
- The cell death percentage was obtained by taking the ratio of A (_490) of background-corrected samples and the average of A (_490) of background-corrected positive controls and multiplying them by 100.
[1]: Puertas-Bartolomé M, Gutiérrez-Urrutia I, Teruel-Enrico L L, et al. Self-Lubricating, Living Contact Lenses. [J]: Advanced materials (Deerfield Beach, Fla.), 2024,36(27): e2313848. https://doi.org/10.1002/adma.202313848
Fabrication of Contact Lens
- A two-step molding process was used.
- 20 µL of bacterial polymer precursor solution were placed into a ring-shape silicon mold (outside diameter 10 mm) and photocrosslinked (420 nm, 6 mW cm(−2)) for 2 min.
- The obtained ring-shape bacteria hydrogel was placed into a convex silicon mold.
- 50 µL of polymer precursor solution were dropped on the top (after sonication for 10 min) covering the external and internal part of the bacterial-hydrogel ring.
- The sample was photocrosslinked (420 nm, 6 mW cm(−2)) for 2 min.
[1]: Puertas-Bartolomé M, Gutiérrez-Urrutia I, Teruel-Enrico L L, et al. Self-Lubricating, Living Contact Lenses. [J]: Advanced materials (Deerfield Beach, Fla.), 2024,36(27): e2313848. https://doi.org/10.1002/adma.202313848
Synthesis of p(HEMA-co-mHA-β-CD)
Synthesis of β-CD-HDA
- 120 g (106 mmol) of β-CD was dissolved in 1000 mL of sodium hydroxide aqueous solution, and 20.16 g (106 mmol) of p-TsCl was dissolved in 60 mL of acetonitrile.
- The two solutions were mixed and allowed to react at room temperature for 2 h.
- The resulting product, mono-6-deoxy-6-(p-tolylsulfonyl)-β-cyclodextrin (M-6-O-Ts-β-CD), was obtained by precipitation at 4 °C for 72 h and vacuum drying at 60 °C for 48 h.
- Subsequently, 14.51 g (114 mmol) of M-6-O-Ts-β-CD and 28.76 g (248 mmol) of 1,6-hexanediamine(HDA) were dissolved in 86 mL of dimethylformamide, and allowed to react at 75 °C for 4 h.
- After precipitation by excessive acetone, the product β-CD-HDA was obtained by vacuum drying at 50 °C for 48 h.
Synthesis of mHA
- A certain amount of Sodium hyaluronan(HA) was dissolved in deionized water, and then reacted with methacrylate(MA) at 4 °C for 24 h away from light.
- Different molar ratios of MA to the structural unit of HA were used (3:1, 7:1, 11:1, and 15:1, respectively).
- After the reaction, the product mixture was dialyzed in deionized water for 5 days to remove the unreacted MA and by-products.
- The purified mHA product was obtained by lyophilization.
Synthesis of mHA-β-CD
- 1.0 g of mHA containing about 2.5 mmol of carboxyl groups (calculated from the molecular weight of HA and the different MA substitution degrees), was dissolved in 300 mL of phosphate buffer saline (PBS) at pH 7.4, followed by adding about 3.08 g (equimolar to the carboxyl groups of mHA) of β-CD-HDA to the mHA solution.
- N-(3-dimethylaminopropyl)-N′-ethylcarbodiimide hydrochloride (EDC) and N-hydroxysuccinimide (NHS) were added to the reaction mixture at a molar ratio of -COOH: EDC: NHS = 1:3:3, and allowed to react with stirring at room temperature for 24 h to facilitate the coupling of mHA and β-CD-HDA.
- After the reaction, the product mixture was dialyzed in deionized water for 5 days to remove the unreacted reagents and impurities.
- The purified mHA-β-CD product was obtained by lyophilization, resulting in the dried product in a powdered form.
Preparation of p(HEMA-co-mHA-β-CD) hydrogels
- A mixture containing mHA-β-CD and 2-Hydroxyethyl methacrylate (HEMA) with a total mass of 8.0 g was dissolved in 6 mL of deionized water, with varying mass fractions of mHA-β-CD (5 %, 7 %, 9 % and 11 %, respectively).
- 160 μL of ammonium persulfate (APS, 16.67 wt%) and 20 μL of N,N,N′,N′-tetramethyl-ethylenediamine (TEMED) were added to the mixture.
- The mixture was fully stirred and then rapidly injected into a flat glass mold.
- The polymerization reaction took place at 37 °C for 24 h to allow for gel formation.
- The resulting p(HEMA-co-mHA-β-CD) hydrogel was obtained after dialysis in deionized water for 5 days to remove the unreacted components.
- The hydrogel was then lyophilized at −60 °C for 48 h to obtain the p(HEMA-co-mHA-β-CD) xerogel.
[2]:Deng H, Zhang X, Su S, et al. Poly(2-hydroxyethyl methacrylate-co-methacrylated hyaluronan-β-cyclodextrin) hydrogel: A potential contact lens material with high hydrophilicity, good mechanical properties and sustained drug delivery. [J]. International journal of biological macromolecules, 2024,283(Pt 1): 137579. https://doi.org/10.1016/j.ijbiomac.2024.137579
Light transmission
- The light transmission of pHEMA and various p(HEMA-co-mHA-β-CD) hydrogels, each 0.3 mm in thickness, were measured using an Ultraviolet-Visible spectrophotometer. The measurements were conducted over a wavelength range of 400–800 nm.
[2]:Deng H, Zhang X, Su S, et al. Poly(2-hydroxyethyl methacrylate-co-methacrylated hyaluronan-β-cyclodextrin) hydrogel: A potential contact lens material with high hydrophilicity, good mechanical properties and sustained drug delivery. [J]. International journal of biological macromolecules, 2024,283(Pt 1): 137579. https://doi.org/10.1016/j.ijbiomac.2024.137579
Polyethylene Glycol(PEG) modification
- A Corona Lab CTP-2000k plasma generator with 60 W was employed to perform the plasma treatment under a water vapor flow for 2 min.
- 0.1 M PEG solution was prepared by dissolving PEG in anhydrous N, N-dimethylformamide (DMF), and the PVA films treated by plasma were immersed into the PEG solution, reacting in a drying oven at 100 °C for 24 h.
- After coupling with PEG, the resultant PVA-PEG films were ultrasonically rinsed with DMF to remove unreacted PEG, and then immersed into a DMF solution containing 5 wt.% N, N′-disuccinimidyl carbonate (DSC) as the bridging agent, reacting in dark place for 24 h at room temperature with the 4-dimethylaminopyridine (DMAP) as the catalyst.
[3]: Rao L, Liu Y, Zhou H. Significantly improved cell affinity of polydimethylsiloxane enabled by a surface-modified strategy with chemical coupling. [J]. Journal of materials science. Materials in medicine, 2022,33(10): 66. https://doi.org/10.1007/s10856-022-06690-3
Modification of negatively charged groups
- A 10 wt% PVA solution in dimethyl sulfoxide (DMSO) was prepared at 80 °C.
- GMA and sulfuric acid (a catalyst) were added to the solution, and the reaction proceeded under stirring at 80 °C for 2 h.
- Once the reaction was completed, the mixture was cooled, the obtained polymer was precipitated in acetone, filtered, then dissolved in distilled water and, finally, purified by dialysis.
- The Acr-PVA-AA hydrogels were prepared by radical crosslinking polymerisation of Acr-PVA with dimethyl sulfoxide(AA) in an aqueous medium.
- The co-monomers and an initiation system were mixed, and the copolymerisation was carried out in thin glass tubes at − 15 °C for 6 h.
- A potassium persulfate and a mixture of hydrogen peroxide with ascorbic acid were used as initiators.
- In order to remove non-aligned AA, the obtained hydrogels were quickly defrosted and washed with boiling distilled water for 3 h. Washings were controlled by spectrophotometer measurements at a wavelength range of 200–400 nm.
[4]: Drozdova M G, Zaytseva-Zotova D S, Akasov R A, et al. Macroporous modified poly (vinyl alcohol) hydrogels with charged groups for tissue engineering: Preparation and in vitro evaluation. [J]. Materials science & engineering. C, Materials for biological applications, 2017,75: 1075~1082.https://doi.org/10.1016/j.msec.2017.03.017
Module 4: Biosafety Module
GPC and fraction collection
The freeze-dried materials were dissolved in ultrapure water at a concentration of 10 mg ml−1 with incubation at 60°C for 1 h. The supernatant was collected after centrifugation at 15 500 g for 10 min, diluted to 2 mg ml−1 and filtered through a 0.45-μm2membrane. Five hundred microliters was loaded into a Superose 6 Increase 10/300 GL column (GE Healthcare Systems, Chicago, IL, USA) on a high-performance liquid chromatography system (Varian Prostar 210; Agilent Technologies, Inc., Santa Clara, CA, USA). Degassed ultrapure water was used as a mobile phase at a flow rate of 0.5 ml min−1 at 25°C. Fractions were collected at the injection time point at 0.5 ml per fraction using an OMNICOLL fraction collector (LAMBDA Instruments GmbH, Baar, Switzerland) in a 96-deep well plate.
Measurement of Fluorescent Proteins
Utilize a fluorescence spectrophotometer to measure the fluorescence emission of fluorescent proteins. The excitation wavelength is 588 nm, and the emission wavelength is 617 nm.
- Use a pipette to transfer 1 mL of bacterial culture into a 1.5 mL Eppendorf tube, and incubate on ice for 10 minutes. The purpose is to stop cell growth and terminate intracellular protein synthesis.
- Centrifuge the bacterial culture at 4°C, 12000 rpm, for 2 minutes, and discard the supernatant.
- Resuspend the collected cells in pre-chilled Na2HPO4/NaH2PO4 buffer (pH 7.0) to achieve an OD600 between 0.25 and 0.5. Within this range, the OD600 value is linearly related to the cell number.
- Measure fluorescence using the fluorescence spectrophotometer. If the fluorescence emission value is greater than 1000, dilute the sample with Na2HPO4/NaH2PO4 buffer.
- Analyze the experimental results using the fluorescence intensity value. Fluorescence intensity = Fluorescence value / OD600.
ATP Quantification Experiments
ATP Quantification: Bacterial PVA-VS/PVA 95:5 hydrogels (40 μL) were prepared in opaque all-white 96-well plates and 300 μL of BHI medium were added on top of each hydrogel. Samples were incubated at 30 °Cfor different time points (from 3 h to 21 days) and medium was changed every 7 days. The CellTiter-Glo 3D Cell Viability Assay (Promega, USA) was used to determine the amount of ATP of the encapsulated bacteria inside the hydrogels. At each specific time point, medium was removed from the hydrogels and the CellTiter-Glo 3D reagent was added to the samples following manufacture's protocol. After 30 min of incubation in the dark at room temperature while shaking, the luminescence of the sample was measured using a multi-mode plate reader. As a control, empty hydrogels and bacterial suspensions were cultured and analyzed under the same conditions. N = 2, experiments were performed at least in triplicate, and average and standard deviation were given. ATP quantification of bacteria encapsulated in PVA-VS/PVA 100:0 and 95:5 hydrogels during incubation for 7 days in BHI medium was also tested using the same methodology. N = 1, the experiment was performed at least in triplicate, and average and standard deviation are given.
Determination of phosphate content
Orthophosphate reacts with ammonium molybdate to form phosphomolybdenum heteropolyacid in the presence of acidic medium, antimony salt and the compound is immediately reduced by ascorbic acid to form a blue color complex and the absorbance is measured at wavelength 880 nm. It can be measured directly using a continuous flow analyzer.
Counting bacteria by fluorescence
- Seed cells: Seed cells (1.0 × 10^4 cells per well) in 24 - well plates (Corning, NY, USA) and incubate at 37 °C overnight until 30% confluency.
- Treat cells: Treat the cells with recombinant proteins at the indicated concentrations.
- Wash cells: After incubation for 12 hours, wash the cells three times with precooled PBS (2.7 mM KCl, 137 mM NaCl, 10 mM Na2HPO4, and 2 mM KH2PO4).
- Fix cells: Fix the cells with paraformaldehyde (PFA, 4%) (Sangon, Shanghai, China).
- Stain cells: Stain the cells with 4,6 - diamidino - 2 - phenylindole (DAPI) (Beyotime, Haimen, China) in the dark.
- Image and analyze: Image the intracellular fluorescence distribution of recombinant proteins using confocal laser scanning microscopy (CLSM) (Nikon, Tokyo, Japan) and fluorescence microscopy (Nikon, Tokyo, Japan). Analyze the data using NLS software.
Module 5: Wet Lab Experiments
Short Peptide Sequence Data
Short peptide sequences that can bind to AQP0 (positive samples)
- AQP0 Protein Expression and Purification
- Phage Display Library Screening
A. Library Selection: Use the Ph.D.-12 phage display peptide library (complexity 2.7×10^9) for four rounds of screening against AQP0.
B. Screening Process:
- Coating: Coat AQP0 (100 μg/mL) onto a 96-well plate, incubate overnight at 4°C, and block with BSA.
- Binding: Add the phage library (4×10^9 PFU/well) and incubate at room temperature for 1 hour.
- Washing: Wash the wells 10 times with TBST to remove unbound phages.
- Elution: Elute the bound phages with 100 mM Gly-HCl (pH 2.2), neutralize, and amplify.
- Amplification: Infect ER2738 host bacteria, precipitate phages with PEG/NaCl, and determine the titer.
- Sequencing and Peptide Synthesis
A. After the fourth round of screening, pick 30 single clones and analyze the repeated sequences using Sanger sequencing.
B. Synthesize the peptides using solid-phase synthesis and purify them by HPLC to a purity greater than 95%.
Affinity Data of Short Peptides
Fluorescence Polarization Assay
- Cloning of NT fragments of IP(3)Rs
-
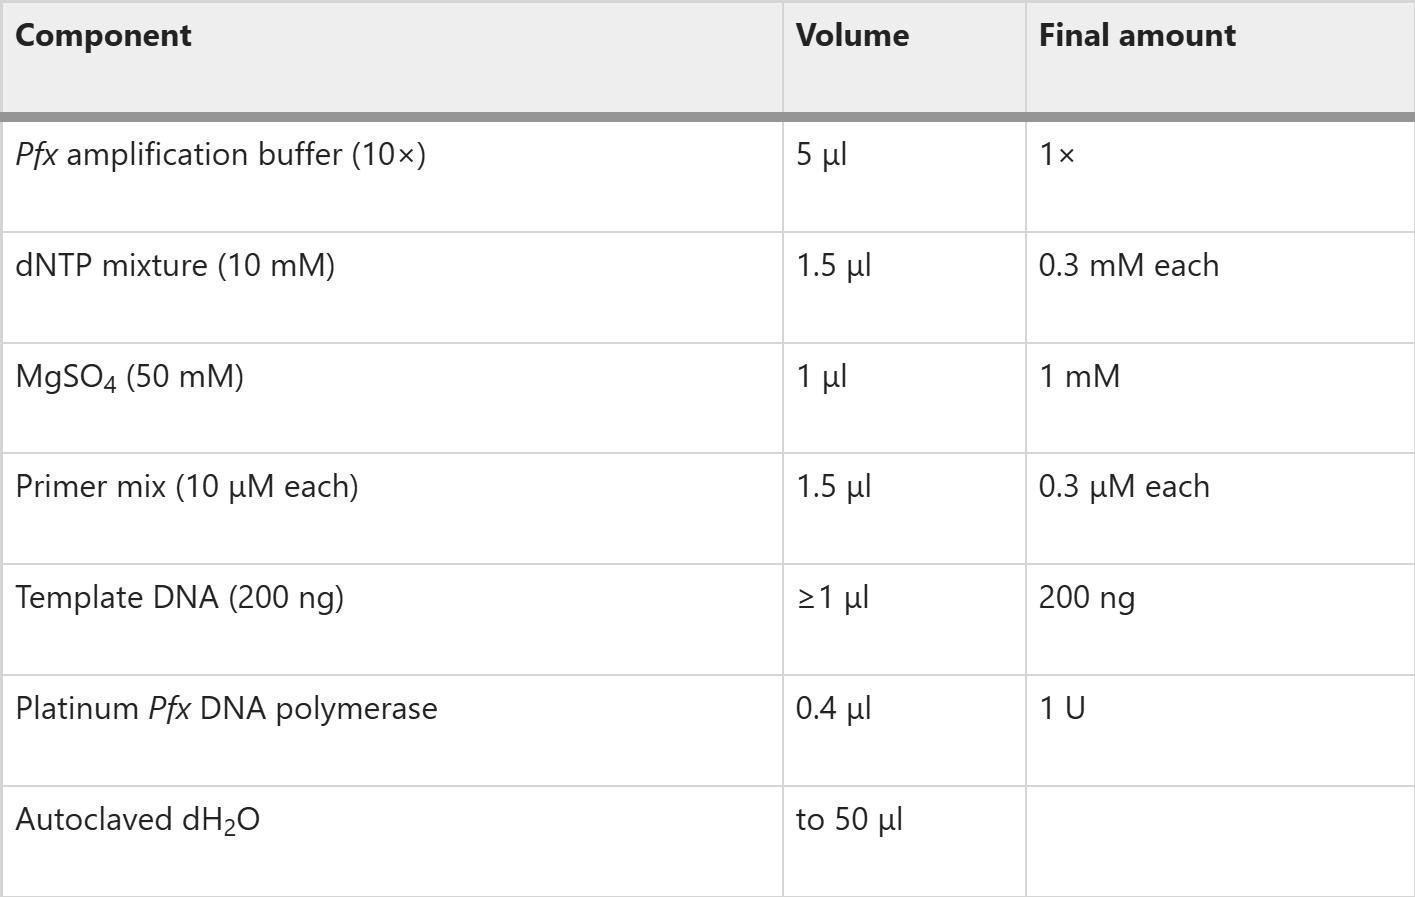
Use Platinum Pfx DNA polymerase (or other available thermostable DNA polymerase) to amplify NT fragments of rat IP(3)R1. As template, use the full-length rat type 1 IP(3)R clone lacking the S1 splice site with primers P1 and P2 for the NT (residues 1–604) and P2 and P3 for the IBC (residues 224–604). The sequences of the primers are listed in Table 3. The fragments are numbered with reference to the full-length (S1+, i.e., with the S1 splice site) rat IP(3)R1 (GenBank accession number: GQ233032.1). For each set of primers, set up the reaction as follows:
-
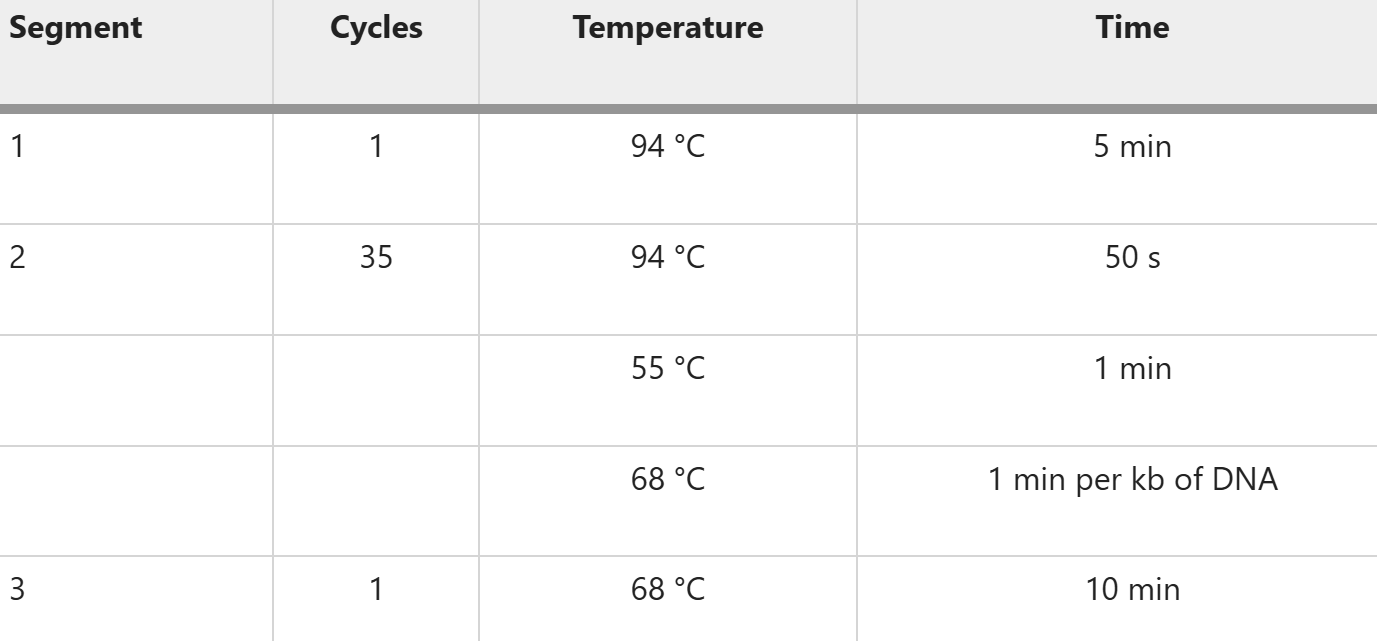
Run PCR reaction in a thermocycler with the following conditions:
- Resolve PCR products by loading a mixture of 10 μl of each PCR reaction (from Step 2), 2 μl of gel-loading dye (6×) and molecular weight markers (2-log DNA ladder) on an ethidium bromide–stained 1% (wt/vol) agarose gel. Electrophorese at 150 V until adequate separation of the PCR bands is achieved (∼20 min). Visualize with a UV transilluminator. Single bands with appropriate molecular weight are expected (about 1.8 and 1.2 kb for the NT and IBC, respectively).
- Linearize the pGEX-6P-2 vector and PCR products (from Step 3) by restriction digestion with BamHI/XhoI restriction enzymes: for each plasmid or PCR product, add 1 μg of DNA, 1 μl of 10× buffer, 0.5 μl of each restriction enzyme and dH(2)O to a final volume of 10 μl. Incubate for 1 h at 37 °C. Ligate the PCR products into linearized pGEX-6P-2 vectors as BamHI/XhoI fragments to give pGEX-NT and pGEX-IBC. To each reaction, add 2 μl of reaction buffer (10×), 300 ng of linearized plasmid vector, enough insert (digested PCR product) to maintain a molar insert/vector ratio of 3:1, 1-μl T4 DNA ligase and autoclaved dH(2)O to a final volume of 20 μl. Incubate for 1 h at 22 °C.
- Transform the ligation reactions (from Step 4) into competent E. coli strain DH5-α cells (or other suitable competent cells) by a standard heat-shock method
- Plate-transform cells on LB-agar plates containing ampicillin (final concentration, 100 μg ml(−1)) and grow for ∼12 h at 37 °C to select ampicillin-resistant clones.
- Pick colonies (∼10 per plate) and incubate each in 2 ml of LB containing ampicillin (final concentration, 100 μg ml(−1)) for ∼12 h at 37 °C. Pellet cells by centrifugation (6,000g for 5 min) and purify plasmid DNA using a standard miniprep plasmid purification kit, following the manufacturer's instructions.
- Verify identity of the purified plasmid DNA (from Step 7) by restriction enzyme digestion. For each plasmid, add 1 μg of plasmid DNA, 1 μl of 10× buffer, 0.5 μl of each restriction enzyme and dH(2)O to a final volume of 10 μl. The same restriction enzymes used for cloning can be used for digestion. Incubate for 1 h at 37 °C. Run digested products (10 μl of each product and 2 μl of 6× gel-loading dye in an ethidium bromide-stained 1% (wt/vol) agarose gel for ∼20 min to check for bands of appropriate size. Confirm sequences of all constructs by DNA sequencing.
- Use QuikChange II XL site-directed mutagenesis kit to insert the S1 splice site (residues 318–332) into the pGEX-IBC construct (from Step 8). Set up each reaction exactly as described in Step 1, using the purified plasmid DNA from Step 8 as template DNA and primers P4 and P5
-
Run PCR reaction in a thermocycler with the following conditions:
- Add 1 μl of the DpnI restriction enzyme to the amplification reaction (from Step 10). Mix and incubate at 37 °C for 1 h to digest the parental DNA.
- Transform 2 μl of the digested product into XL10-Gold ultracompetent cells provided with the kit, following the manufacturer's instructions. Plate transform cells in LB plates containing ampicillin (final concentration, 100 μg ml(−1)) and incubate for ∼12 h at 37 °C to select the ampicillin-resistant clones.
- Pick up colonies (approximately five colonies per clone) and incubate each in 2 ml of LB medium containing ampicillin (final concentration, 100 μg ml(−1)) for ∼12 h at 37 °C. Pellet cells by centrifugation (6,000g for 5 min) and purify plasmid DNA using a standard miniprep plasmid purification kit (e.g., QIAprep spin miniprep kit), following the manufacturer's instructions. Confirm sequences of all constructs by DNA sequencing.
-
- Expression of IP(3)R fragments
- Transform pGEX-NT and pGEX-IBC (from Steps 8 and 13, respectively) into competent E. coli AVB101 (or other competent E. coli strain such as BL21 D3) by a standard heat-shock method.
- Plate-transform cells on LB-agar plates containing ampicillin (100 μg ml(−1)) and incubate overnight at 37 °C.
- Inoculate a single colony in 2 ml of LB medium containing ampicillin (final 100 μg ml(−1)) and incubate in an orbital shaker at 250 r.p.m. for ∼12 h at 37 °C.
- Inoculate 1 ml of the culture (from Step 16) into 100 ml of LB medium containing ampicillin (final concentration, 100 μg ml(−1)). The cultures can be scaled up to provide the amount of protein required.
- Grow the cultures (from Step 17) in an orbital shaker (∼150 r.p.m.) at 22 °C until the OD(600) (optical density at 600 nm) reaches about 1–1.5 (after ∼7 h). These conditions (notably the incubation temperature of 22 °C, rather than 37 °C used for expression of most proteins) are specifically optimized for expression of N-terminal fragments of IP(3)Rs.
- Induce expression of cultures (from Step 18) by adding 100 μl of 0.5 M IPTG (final concentration, 0.5 mM). Incubate induced cultures at 15 °C with orbital shaking (150 r.p.m.).
- At 20 h after induction, centrifuge the cells at 6,000g for 5 min at 22 °C. Discard the supernatant, wash the pellet with 10 ml of cold PBS by gently pipetting the cells and then centrifuge at 6,000g for 5 min.
- Resupend the pellet in 4.4 ml of ice-cold TEM containing protease inhibitor cocktail (Roche protease inhibitor cocktail tablet complete mini, 1 tablet per 10 ml). Vortex until the pellet is fully resuspended.
- Add 0.5 ml of PopCulture (final concentration, 10% (vol/vol)) and 100 μl of 50 mM 2-mercaptoethanol (final concentration, 1 mM) to the resuspended pellet (from Step 21). Incubate the suspension with lysozyme (5 μl of a solution of 100 mg ml(−1); final concentration 100 μg ml(−1)) and RNase (2.5 μl of a solution of 20 mg ml(−1); final concentration, 10 μg ml(−1)) on ice for 30 min.
- Sonicate the lysate from Step 22 on ice for 20 s and centrifuge at 30,000g for 60 min at 4 °C. Collect the supernatant.
- Save aliquots (∼1 ml) of the supernatant (from Step 23) to quantify protein expression by western blotting (Step 26). The lysate can be frozen in liquid nitrogen before storage at −80 °C.
- To allow analysis of protein expression by western blotting, load 1−10 μl of lysate (from Step 24) per lane and molecular weight markers onto a NuPage precast 4–12% gel. Run the gel with the XCell SureLock mini cell according to the manufacturer's instructions.
- Transfer the gel onto a PVDF membrane with the iBlot gel-transfer device, according to the manufacturer's instructions. Western blot is performed using anti-GST antibody (1:3,000) and goat anti-rabbit antibody (1:5,000) . The western blot will reveal whether protein of the expected size has been successfully expressed.
- Purification of IP(3)R fragments
- If the protein lysate has been frozen, thaw it on ice and then centrifuge at 30,000g for 30 min at 4 °C to clear the supernatant.
- Gently shake the glutathione Sepharose 4B beads to resuspend the medium. Transfer 665 μl of the slurry (which is ∼75%) to a 50-ml tube. Sediment the slurry by centrifugation at 500g for 5 min. Aspirate the supernatant carefully and discard.
- Wash the glutathione Sepharose 4B beads by adding 10 ml of cold PBS and separate beads by centrifugation at 500g for 5 min. Aspirate the supernatant carefully and discard. Repeat this wash twice more.
- Add 500 μl of cold PBS to the washed and sedimented glutathione Sepharose 4B beads (from Step 29) to give a 50% slurry; add 50 ml of the cleared lysate (from Step 23 or Step 27) to the 50% slurry and mix by gentle inversion.
- Incubate the mixture from Step 30 for 30 min at ∼22 °C with gentle (∼6 r.p.m.) end-over-end rotation. Pour the mixture into an empty PD-10 column. Tap the column and allow the beads to settle.
- Open the column outlet and allow the column to drain. Save an aliquot (∼50 μl) of the flow-through for analysis of nonretained proteins by electrophoresis and Coomassie staining
- Close the column outlet and wash the drained beads by adding 10 ml of Ca(2+)-free CLM containing DTT (final concentration, 1 mM) to the column. Incubate for 5 min with gentle end-over-end rotation. Open the column outlet and allow the column to drain. Save an aliquot (∼50 μl) of the flow-through for analysis by electrophoresis and Coomassie staining.
- Repeat wash (Step 33) four times. Save aliquots (∼50 μl) from each wash step for analysis by electrophoresis and Coomassie staining
- Prepare PreScission protease mix by adding 40 μl (80 U) of PreScission protease to 460 μl of cold Ca(2+)-free CLM supplemented with 1 mM DTT. Load the PreScission protease mixture onto the column from Step 34.
- Seal the column and incubate with gentle end-over-end rotation for ∼12 h at 4 °C
- Open the column outlet and collect the eluate, which contains purified IP(3)R fragments. PreScission enzyme is GST tagged, so it remains bound to the column. Save aliquots (∼50 μl) for analysis by electrophoresis and Coomassie staining and quantification of IP(3)-binding sites
- Add 500 μl of Ca(2+)-free CLM supplemented with 1 mM DTT to the column and rotate for 5 min at 4 °C. Collect the eluate, which also contains purified IP(3)R fragments. Save aliquots (∼50 μl) for analysis by electrophoresis and Coomassie staining and quantification of IP(3)-binding sites
- Repeat Step 38.
- Load 10–20 μl of each fraction per lane, and molecular weight markers onto a NuPage pre-cast 4–12% gel. Run the gel with the XCell SureLock mini cell, and stain it with Coomassie according to the manufacturers' instructions. Check the content of purified protein in each eluate fraction and pool appropriate fractions. To avoid excessive dilution of the protein, pool only fractions for which the intensity of the Coomassie-stained band is >25% that of the first fraction. This is the 'purified protein'. Aliquot into small volumes (∼100 μl) and save aliquots for quantification of IP(3)-binding sites. Freeze remaining aliquots in liquid nitrogen for storage at −80 °C.
- Quantification of the concentration of IP3-binding sites
- Determine the total protein concentration in the 'purified protein' sample accurately using the D(C) protein assay kit (or other standard protein assay), according to the manufacturer's instructions.
- Load 1–10 μg per lane (at least 2 lanes per protein) of purified protein and molecular weight markers onto two NuPage pre-cast 4–12% gels. Run both gels with the XCell SureLock mini cell, following the manufacturer's instructions.
- Perform silver-staining of one gel according to the manufacturer's instructions. Transfer the other gel to a PVDF membrane using the iBlot system following the manufacturer's instructions and western blot with appropriate antisera. We use rabbit antisera (1:1,000) raised to peptides corresponding to residues 62–75 or 326–343 (the SI splice site)(4) of IP(3)R1 for NT and IBC fragments, respectively. The secondary antibody is horseradish peroxidase–conjugated goat anti-rabbit antibody (1:5,000)
- Quantify the intensity of all bands in each lane for each protein in both silver-stained gels and western blots. Use ImageJ
- Determine the K(D) and density of binding sites (B(max)) from the same 'purified protein' sample (from Step 40) using conventional radioligand-binding assays with (3)H-IP(3)
- Preparation of plates for FP assays
This step can be performed using option A for equilibrium saturation binding assays or option B for equilibrium competition binding assays:
- Preparation of plates for FP equilibrium saturation binding assays
- Load a half-area, black, round-bottom, polystyrene, 96-well plate with duplicate 50-μl samples of the following in Ca(2+)-free CLM
- Gently shake the plate (30 r.p.m.) for 15 min at ∼22 °C using an orbital shaker or the orbital shaking mode in the Pherastar plate reader. Centrifuge at 300g for 2 min at ∼22 °C.
- Incubate the plate in the dark at the temperature under investigation (typically 4–37 °C) for 20 min for equilibrium to be attained. Measure I(||) and I(⊥) using the Pherastar plate reader (Steps 47–49). After collection of measurements at one temperature, the instrument and plate can be re-equilibrated to another temperature, and the measurements of I(||) and I(⊥) repeated on the same samples
- Preparation of assay plates for FP equilibrium competition binding assays
- Load a half-area, black, round-bottom, polystyrene, 96-well plate with duplicate 50-μl samples of the following in Ca(2+)-free CLM:
- Gently shake the plate (30 r.p.m.) for 15 min at ∼22 °C using an orbital shaker or the orbital shaking mode in the Pherastar plate reader. Centrifuge at 300g for 2 min at ∼22 °C.
- Incubate the plate in the dark at the temperature at which the measurements will be made for 20 min for equilibrium to be attained. Measure I(||) and I(⊥) using the Pherastar plate reader
- Preparation of plates for FP equilibrium saturation binding assays
- Anisotropy measurements
- Open the Pherastar software and select the FP option. Insert the FP 485/520/520 optic module. Set Pherastar options as follows: three cycles of measurement; 300 flashes per cycle; 1 s positioning delay; reading direction 11
- Perform auto-adjustment of focal height and gain in the well containing 50 μl of 0.5 nM FITC-IP(3). Set the 'mP Target' value to 25. The focal height for 50 μl of solution in a half-area well should be ∼6.3
- Use these settings to measure the entire plate. Samples are excited with horizontally polarized light at 485 nm, and emission is simultaneously measured at 520 nm in the horizontal (i.e., parallel, I(||)) and vertical (i.e., perpendicular, I(⊥)) planes
- Analysis
- For each experimental measurement, subtract the background I(||) and I(⊥) due to the presence of the protein alone. From equation (5), calculate A(M) using the corrected values of I(||) and I(⊥).
- Calculate A(I) similarly (using equation (5)) from the values of I(||) and I(⊥) determined for each protein concentration in the presence of a saturating concentration of competing ligand (IP(3)). From A(I) and A(D*), calculate A(NS) (A due to nonspecific binding) at each protein concentration using equations (9) and . For each experimental determination of A(M) (Step 50) and the corresponding A(NS), calculate A(S) (A due to specific binding of FITC-IP3) from equation
- A(S) (Steps 50 and 51) can then be used to calculate the fraction of D bound to R using equation or directly to plot the saturation binding curve.(*)
-
If R(T) is sufficient to ensure minimal depletion after binding D, plot A(*)(S) against R(T) (∼[R]) to provide a typical binding curve. If R(T) is too low to avoid a significant decrease in [R] as D binds, [R] must be calculated for each condition before plotting the binding curve. In either case, any suitable curve-fitting program (we use GraphPad Prism version 5) can be used to fit the results to a Hill equation where α is the fraction of D specifically bound, and h is the Hill coefficient. From this, we determine the K(*)(D) (K(D)((D*))) of the interaction between D (FITC-IP(*)(3)) and R (NT or IBC).
- For equilibrium competition binding measurements, calculate A(M) and then A(S). From these A(S) values, compute the total concentration (I(50)) of the inhibitor (I) that causes 50% displacement of specifically bound D*.
- From the I(50) (Step 54), the Kd determined from saturation binding and the known D(*)(T) and R(T), calculate the free concentration of I (IC(50)) required to displace 50% of specifically bound D. The K(D) of I for the binding site (K(D)(I)) is then calculated using equation.
-
For experiments performed at different temperatures, the K(D) can be calculated from saturation or competition binding experiments at each temperature. Equations (3) and (4) define the relationships between K(D), ΔG°, ΔS° and ΔH°. If ΔH° is temperature independent (i.e., the change in heat capacity, ΔC = 0), a van't Hoff plot (lnK(D) versus 1/T) can be used to obtain ΔH°/R from the slope. If ΔC ≠ 0 the following equation is used where T is the actual absolute temperature and T(0) is the reference absolute temperature (296 °K in our experiments). ΔH°, ΔS° and ΔC° are determined by least-squares curve-fitting of ΔG° versus T.
Physicochemical Properties
- Hydrophilicity and Hydrophobicity: RP-HPLC
Materials
- HPLC device (controller, autosampler, pumps, UV detector, degassing unit, column oven)
- C18 Reverse Phase Column
- 38 mM Phosphate Buffer (pH = 2.0)
- Methanol (HPLC grade)
- Sample vials and caps, organic waste
Sample Preparation
- Take samples from the enzymatic reaction and cool them.
- Optional: Add internal standard.
- Dilute the samples 10 times.
- Add methanol (equal volume to sample), mix well.
- Freeze for 30 minutes, then centrifuge at maximum speed for 30 minutes.
- Transfer the supernatant to sample vials.
- Dilute 5 times with ddH2O, mix well.
Experimental Setup
- Column: Nucleosil 100-5 C18
- Aqueous Phase: 38 mM Phosphate Buffer (pH = 2.0)
- Organic Phase: Methanol (HPLC grade)
- Pump Settings:
- 0-15 min: 10-20% methanol gradient
- 15-20 min: 80% methanol (washing)
- 20-30 min: 10% methanol (balancing)
- Flow rate: 0.5 mL/min
- Column Temperature: 30°C
- Detection: 250-300 nm
- Injection Volume: 10 µL
Running the HPLC Device
- Start all components, connect phosphate buffer and methanol to pumps.
- Purge the pump lines and balance the column.
- Set up the method and insert sample vials, then start the batch file.
Data Processing
- Import chromatograms and perform baseline correction.
- Run peak identification and peak integration, record peak areas.
- Convert concentrations using standards and internal standard methods.
- Molecular Weight: Gel Electrophoresis
- Isoelectric Point: Isoelectric Focusing Electrophoresis
-
Gel Preparation: Clean the glass tubes of the disc electrophoresis apparatus. Seal the bottom with plastic film and an elastic band. Place the tubes vertically in a test tube rack. Using a pipette, transfer the prepared gel solution into the tubes, filling them to 1 mm below the tube opening. Apply a water seal to ensure the top of the gel column is flat. Allow the gel to polymerize vertically for about 30 minutes.
- Setting up the Apparatus and Electrophoresis: Remove the water seal using filter paper strips and peel off the plastic film from the bottom. With the sealed end facing up, vertically insert the gel tubes into the disc electrophoresis apparatus, adjusting the height of each tube and noting the tube numbers. Approximately 1/3 of each tube should be in the upper compartment, and 2/3 in the lower compartment. Add 500 mL of 0.1M H₃PO₄ to the upper compartment and 500 mL of 0.1M NaOH to the lower compartment, submerging the tube openings and electrodes. Use a syringe or pipette to remove air bubbles from the tube openings. Connect the upper compartment to the positive electrode and the lower compartment to the negative electrode. Start the electrophoresis apparatus, set to a constant voltage of 160V, and focus for 2-3 hours, or until the current decreases to nearly zero and no longer decreases. Stop electrophoresis.
- Gel Stripping: Remove the gel tubes and wash them twice with water. Gently insert a needle along the wall of the tube with a syringe, rotating the tube and the inserted needle. Inject a small amount of water at both ends of the tube, and the gel strips will slide out automatically.
- Fixation: Place two gel strips in a small culture dish and add 10% trichloroacetic acid (TCA) solution to cover the strips for fixation. After about half an hour, white protein precipitate bands should appear in the gel strips. Once fixation is complete, pour out the fixation solution and use a ruler to measure the length of the gel strip "L2" and the distance from the positive end to the center of the protein precipitate band (i.e., the focusing site), "L'". The fixed gel strips can be scanned on a Kangqiang 860 UV/Vis spectrophotometer at 280 nm or 238 nm. Perform corresponding measurements and calculations using the scan data.
- pH Gradient Measurement: Place an unfixed gel strip into another culture dish and use a ruler to measure the length "L1" of the gel strip to be tested for pH. Using tweezers and a small knife, cut the gel strip into 10 mm segments, placing each segment in a small test tube. Add 1 mL of water to each test tube and soak for at least half an hour or overnight. Measure the pH of the eluted solution in each tube using a carefully calibrated pH meter with a long, narrow pH electrode.
-
Determination of Exposure/Non-Exposure Thresholds
Identification of Specific and Quantitative Binding of Small Molecules to Various Natural Amino Acids.